Showing posts with label how-to. Show all posts

Monday, January 26, 2015

How to Write a Scientific Paper


As I enter the latter stages of my PhD, I'm working to summarize all the stuff I've done over these past four and a half years in a series of publications that will ultimately become my thesis. This sounds daunting and tedious, and it most certainly is...but not for the reasons you would think. Here is a guide for all you first-time paper writers out there!

Preparation


Beginning to write the paper can go one of two ways:

1) you want to publish your work because you feel that you have finally gathered enough data to make an important contribution to the scientific literature
2) your advisor comes to you saying we need to publish this paper RIGHT NOW or your sworn enemy lab will scoop you

Gather your data. Discover that you didn't write down the one piece of relevant information that you need in your lab notebook. Panic, then try to rationalize how you can write the paper without that one critical piece of information.


Composition


Frantically write the paper

Wait three months while the paper sits on your advisor's desk

Try to find your advisor. Discover that he has left the country for a month without telling anyone.

While you are waiting, perform an experiment that you think will support your paper's conclusions and add to the breadth of data. Experiment contradicts your previous results, and you need to change the entire paper.

Re-write paper in a frenzy and send out revised version

Wait again, as your advisor has gone to a conference for the week.


Revisions


Receive edits from your advisor. Re-write the entire paper for a third time. 

More Edits.

Even MORE EDITS.

Co-author who hasn't said anything up to this point suddenly decides that everything is wrong in the paper and it needs to be rewritten. Re-write the paper for a fourth time.

MORE EDITS.

Endnote library crashes.

You decide to accept all of your advisor's edits because you are now nauseated by looking at this paper and don't care anymore. Time to submit! 


Submission


Almost there!

Attempt to fit your text into an excessively complicated Word template that was last published in Word 2003. Discover that Word 2003 and Word 2013 really don't like each other. Don't even get me started on Mac/PC compatibility.

Even though you already included your figures in their template, the journal requires that you upload every figure and table individually. Your image size will exceed the file size required for figures. Sucks. You're getting JPEGs, jerks.

Decision


Accepted! 

This never happens just by itself. If your paper is simply "Accepted", there has likely been an error. 

Accepted with major revisions or Accepted with minor revisions

Major and minor are clearly in the eye of the beholder. Either category can range from redoing figure captions to redoing the experiments that the entire paper was based on.

Reviewer #3 will think your paper is terrible no matter what. Get out your thesaurus and figure out the most tactful way to say "You are an idiot" without insulting the editor.

Rejected

Try submitting to our sister journal that no one has ever heard of! Impact factor: 0.5

OR

Appeal the decision. Fight! Fight! Fight! This may or may not be successful, so proceed with caution. 

Congratulations! You have successfully written a scientific paper! Elapsed time: 18 months


Monday, August 11, 2014

I'm back! (and lavender simple syrup)


Friends, friends, friends. I am back from the depths of conferences and wedding planning to bring you a recipe that is entirely summer: simple and fresh. Things have been super crazy here at S&C, as I've gone to two conferences, spent a weekend back in PA, gone on a mini-vacation to Portland and run two 10Ks and an 8K. Phew! This weekend was very low-key, and I'm grateful for the chance to take it easy!

One of my favorite parts of summer is growing herbs on our back porch. Andy and I are really lucky that we are able to have a little bit of our own outdoor space in the middle of a city. We can eat outside at our patio table and enjoy our garden and a nice breeze.

This year, we are growing cherry tomatoes (bruschetta!), basil (pesto!), peppermint (flavored water!), Thai basil (stir frys!), rosemary (everything!), lemon thyme (cake!), and lavender (?!). Lavender is totally new to me, but I figured it would be a fun challenge to use it in my cooking. So far, I have made lemon-lavender tea cakes that were devoured by my labmates as well as lavender simple syrup, which I am going to share with you.


Why was I not aware that simple syrups are so...simple? And that you can flavor them with WHATEVER you want! We have a SodaStream, and I can't wait to make my own lavender soda. And lavender lemonade. And lavender everything.


Lavender Simple Syrup

Science & Cupcakes Original

Makes 1.5 cups


Ingredients


1 cup granulated sugar
1 cup water
1.5 tablespoon fresh lavender flowers/buds (you could also use dried lavender if you don't have fresh)

Instructions

Combine water, sugar, and lavender in a small saucepan. Bring mixture to a boil. Lower heat and let simmer for 5 minutes. Remove from heat, and let cool slightly. Using a fine strainer, remove the lavender leaves from the syrup. Let syrup cool completely, and store in an airtight vessel.


Sunday, September 15, 2013

How to Make Filled Cupcakes

Since I've mentioned this technique a few times in my recipes, I thought that making an instructional page on how to make filled cupcakes might be useful, especially because it seems super intimidating if you've never done it before (spoiler alert: it's not that hard!). Just a little bit of extra work can take your cupcakes from awesome to over-the-top.

Materials:
  • A sharp knife (my preferred method) or cupcake corer (I use a small biscuit cutter for this purpose)
  • Your cupcake, cooled
  • Your filling, cooled


Procedure:

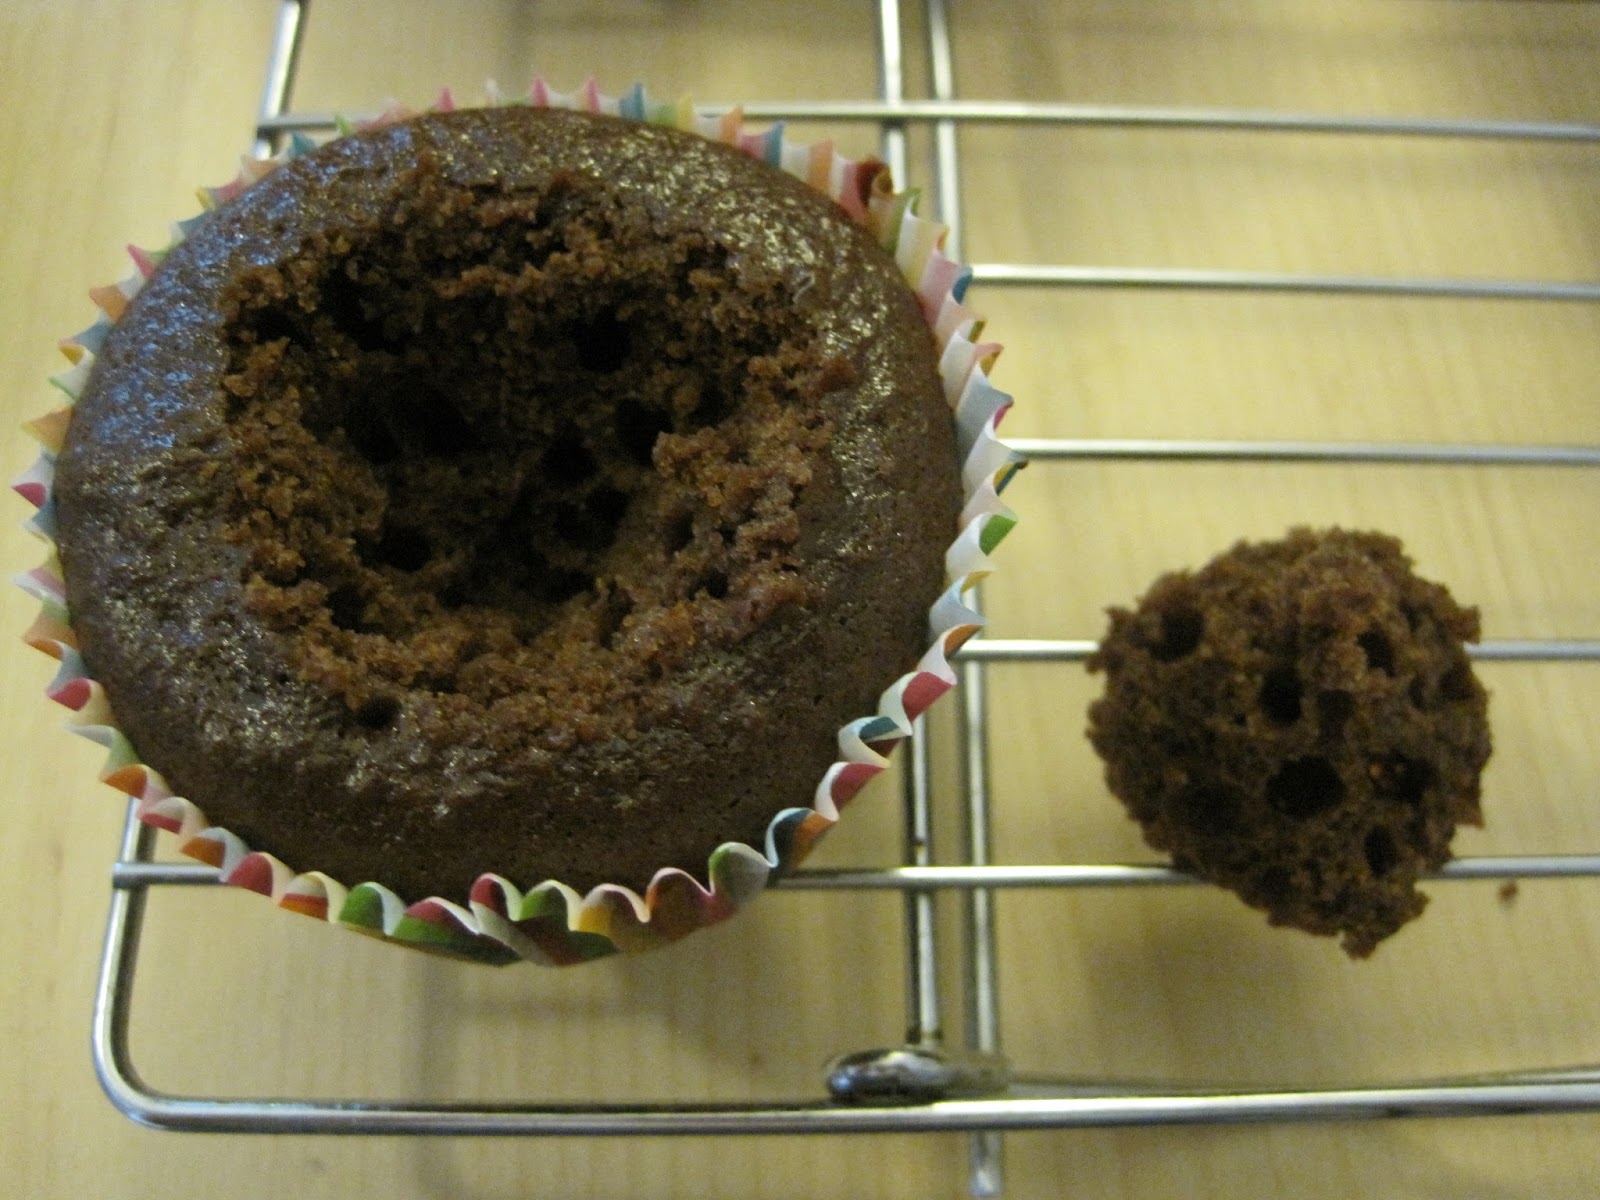
1. Remove the center of your cupcake.

If using a cupcake corer, gently twist the cutter into the top of the cupcake while applying gentle pressure, trying not to squash the cupcake in the process. To remove the cake, pull gently on the top of the corer, twisting a bit to separate the center of the cake from the rest of your cupcake.


If using a knife, place the knife at a 45 degree angle to the surface of your cupcake. Gently cut a circle out of the top of the cake, maintaining a 45 degree angle with your knife until you've cut all the way around to make a cut out in the shape of a cone. Gently lift out the cone.


This extra cake can either be eaten (RIGHT NOW), discarded (lame), repurposed (I've made cake balls out of the extra cake!), or used to cork your cupcake if you have a particularly tricky filling (like something with fruit that could look lumpy) or a liquidy frosting (like a glaze). More on this option in a second.


2. Fill your cupcake.

If you do not plan to replace the piece of cake that you removed in step one, fill your cupcake so that the filling is level with the top of the cake. You may even want to extend the filling over the edges a bit to make the surface flat. 


If you would like to put the cake center back on top of the filling, fill the cupcake about 3/4 full, leaving a bit of room for the displaced cake. Put the cake back in the center, gently pressing down to put it back into place. It will not be exactly level, but try to do the best that you can to get it securely in place.


3. Frost your cupcake.

Let the cupcake sit for 10 minutes or so to let your filling settle into its new surroundings. Your cake may absorb some filling, meaning you need to add a little bit more to get it to be level with the top. Also, if you have a liquidy filling, frosting the cakes immediately after filling may cause some of the filling to get carried along with the frosting, resulting in a swirl of your filling in your frosting.

After waiting a bit, frost the cupcake with your frosting of choice, making sure to cover any seams from the filling process. 


4. Bask in the praise of your cupcake audience. 

See that wasn't so bad, was it? I knew you could do it!